
Shinai (Bamboo Sword)
The shinai is the primary weapon of modern kendo—a bundle of four bamboo staves bound together to simulate a sword while dispersing impact energy. Understanding shinai construction, selecting correct size, and maintaining integrity through regular inspection keep practice safe for everyone.
Construction and Parts
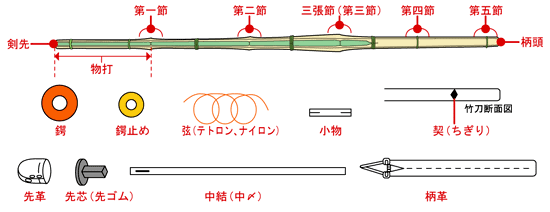
A shinai comprises four bamboo slats bound into a single sword. The diagram labels each part from kensaki (tip) and monouchi (striking zone) through the five nodes (fushi), leather fittings, tsuba, and tsuru string. Regulation shinai meet FIK/AJKF specifications for length and weight.
- Kensaki (剣先) — tip of the shinai
- Monouchi (物打) — striking zone from tip to first node
- Fushi (節) — bamboo nodes: 1st through 5th from tip to handle
- Sanchō fushi (三張節) — the widest 3rd node
- Tsukagashira (柄頭) — butt end of the handle
- Sakigawa (先革) — leather cap covering the tip
- Sakishin / sakigomu (先芯) — rubber or plastic plug inside the tip
- Nakayui (中結) — leather binding at one-quarter length (monouchi area)
- Tsukagawa (柄革) — leather sleeve wrapping the handle
- Tsuba (鍔) — hand guard; tsubadome (鍔止め) holds it in place
- Tsuru (弦) — Tetoron or nylon string along the back
- Chigiri (契) — square metal insert keeping slats aligned inside the handle
- Four take (竹) — bamboo slats bound into a single sword
Safety Risks & Bamboo Types
A neglected shinai can cause serious injury — splinters, loose tsuru, or a launched sakigawa. Different bamboo species offer different flex and durability; understanding types helps you choose and maintain wisely.
- — Safety —
- A broken shinai, loose tsuru, or loose nakayui can launch the sakigawa — bamboo slats may pierce an eye
- Splinters entering men or arms injure partners even without a full break
- Check and maintain your shinai after every keiko — do not rely on tape or carbon fibre as a substitute
- Old or dried bamboo is fragile — mark and retire it rather than risk injury
- — Bamboo types —
- Keichiku — warm-region bamboo; denser and stiffer, breaks more easily; cheaper; may dry out at customs
- Madake — harvested Oct–Feb; denser and more flexible than keichiku; splinters but rarely splits cleanly
- Mosochiku — largest bamboo; too inflexible for shinai construction
- Scrape splinter edges and oil with Vaseline; scrape from hilt toward tip, never tip toward hilt
- If bamboo splits with or against the grain, stop using it — taping is dangerous
Sizing Guidelines
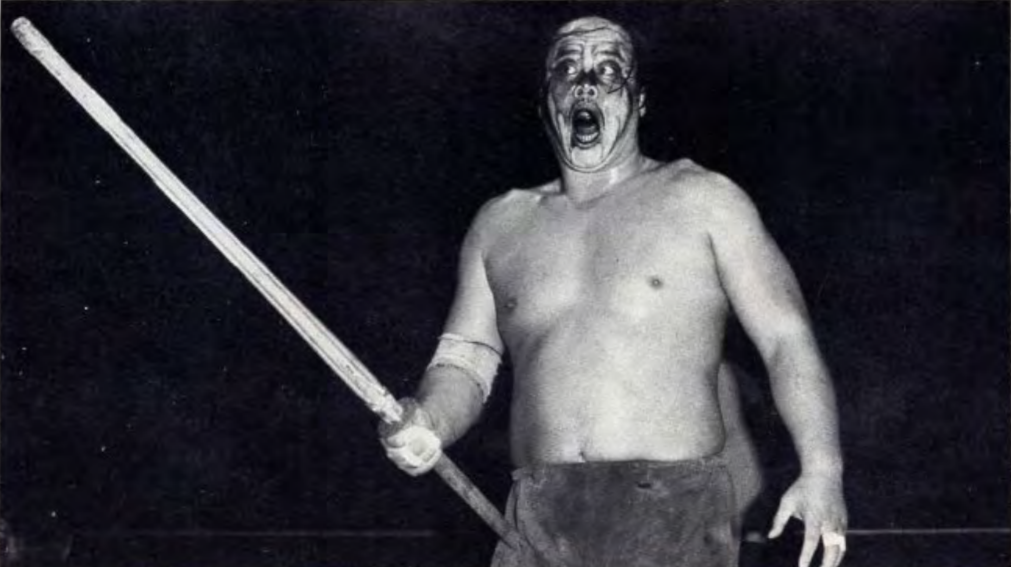
Shinai length corresponds to the practitioner's age, sex, and federation category. The comparison chart shows how sizes 38 and 39 differ in maximum length, minimum weight, sakigawa diameter, reach, and official tournament requirements.
- Size 38 (san-hachi) — primary users: high school students (ages 15–18)
- Size 39 (san-ku) — primary users: university students and adults (18+)
- Max length: 38 = 117 cm (~46 in); 39 = 120 cm (~47 in)
- Min weight (male): 38 = 480 g; 39 = 510 g (fully assembled)
- Min weight (female): 38 = 400 g; 39 = 440 g (fully assembled)
- Min sakigawa diameter: 38 = 25 mm (M) / 24 mm (F); 39 = 26 mm (M) / 25 mm (F)
- Reach: 39 gives +3 cm over size 38
- Maneuverability: 38 rotates faster in close quarters; 39 carries more momentum
- Tsuka thickness: 38 generally slimmer; 39 generally thicker
- Formal tournaments: adult women use 38; adult men must use 39
- — By age (general guide) —
- Primary school: max 99–111 cm (sabuni 3.2 to saburoku 3.6 shaku)
- Junior high: max 114 cm (sannana 3.7) — min weight 400–440 g
- High school: max 117 cm (sanpachi 3.8) — min weight 420–480 g
- Adult / university: max 120 cm (sanku 3.9) — min weight 440–510 g
- Ni-tō (two swords): longer max 114 cm, shorter max 62 cm
- Minimum sakigawa diameter: 24–26 mm depending on sex and size (JKF 1999)
- 1 sun = 3.03 cm; 1 shaku = 10 sun — traditional size names still used in shops
Flex Test & Inspection
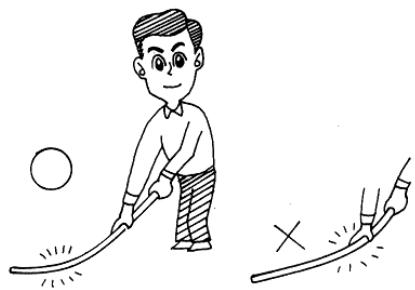
Before keiko, bend the shinai gently to test flexibility — a cracked or dried slat will not flex evenly. Combine this with the standard pre-keiko inspection and assembly steps below.
- Place the tip on the floor and bend — a good shinai flexes about one-third from the tip (near nakayui)
- You should feel the shinai push back at the striking zone
- Weak shinai bend at the tsuba and whip back harder than bogu can absorb
- Warning signs: bends at tsuba; thin handle from over-planing; thin tip, thick middle, thin hilt profile
- Maintaining your shinai by hand builds samurai spirit and deep respect for bamboo
Maintenance & Assembly
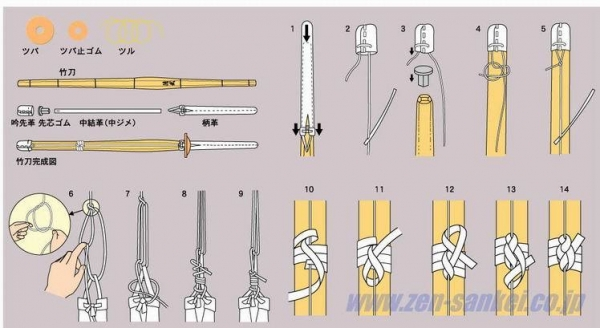
Before every keiko, inspect slats for splinters, check sakigawa and sakigomu, verify nakayui at one-quarter length, and ensure tsuru tension is correct. The diagram shows how to assemble or re-string a shinai—from tip and saki-gomu placement through handle tension to nakayui tying. Stop immediately and switch shinai if damage appears during practice.
- — Pre-keiko inspection —
- Slats — no splinters, cracks, or tape repairs; oil bamboo in cool humidity
- Sakigawa — replace if tip wear exposes slats or sakigomu
- Sakigomu — fitted correctly at the tip (critical for carbon shinai)
- Nakayui — tied tight at one-quarter length from the tip
- Tsuru — tight enough to hold sakigawa without bowing the shinai
- Tsukagawa — no split seams or holes in the handle leather
- When in doubt, throw it out
- — Assembly / re-stringing —
- Parts: four take (bamboo slats), sakigawa, saki-gomu, nakayui, tsukagawa, tsuba, tsubadome, tsuru
- Steps 1–2: slide sakigawa onto the tip; thread tsuru through the sakigawa loop
- Step 3: insert saki-gomu into the centre of the four slats before pulling sakigawa down
- Steps 4–5: tie the tsuru knot at the sakigawa loop to secure the tip
- Steps 6–9: form the handle-end loop, thread tsuru through the tsukagawa leather loop, tension, and knot securely
- Steps 10–14: wrap and interlock the nakayui at one-quarter length; finish with a tight, even knot
- Correct tsuru tension holds sakigawa without bowing the shinai
- When in doubt about any component, replace rather than repair with tape
Shinai Etiquette
Treat the shinai as you would a live blade: carry it respectfully, never lean on it, and place it carefully when not in use. During rei, the shinai accompanies the bow. This etiquette cultivates the mindset that the sword is sacred regardless of its material.
Further reading
- Shinai — Wikipedia (opens external site)
Parts, sizing conventions, and safety background.